Photographing your artwork...

Ankou

Quick tips for those of you photographing your artwork...

Had a few minutes this morning, and thought I'd start a thread for those who might need a few tips here and there on recording their artwork. Please feel free to add to or dispute a statement. Just thought this might be useful to someone.

Always set a head on shot for 2D works preferably using an easle for the art and a tripod (or stool of fixed stand of somekind) for the camera. For 3D works a slight angle is usually best. Shoot several angles to find what works best for you and crop the edges to square (assuming it's on a 2D base).

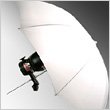
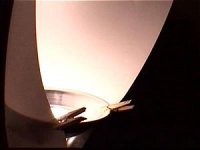
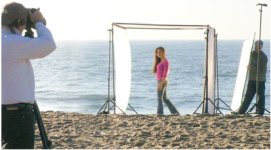
The best light an amature can get is sunlight on a slightly overcast day, not too bright or yellow. A good overcast day will produce a diffused white light evenly across the art work. Flash is just a pain to deal with as is the average indoor lighting situation. If you need to use a flash, try using a layer or three of tracing paper to diffuse the light.

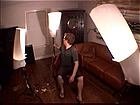
Set up a station, and just shoot one piece after the other. Take several shots, adjusting and tweaking your camera until you get the look you want and write those settings down for future use.

If your using digital, check it in the computer on the printer after the first piece is shot, so you know in real time what the image will look like in it's end product. If your using film, take good notes, because you'll have to do at least two seperate days.

Developing is worth paying for in film. If your shooting artwork on film, I highly recommend going to a small private owned photo developer (trained photographers w/ day jobs ;) ). A well shot photo means nothing if the developing is poor quality.

Digital prints have a mess a variables to deal with, and a little research will get you a long way. The type of printer you buy, the paper quality, the file format your shooting in, the resolution your shooting, and what program your pushing it all through. Color matching your screen to your printer.... It goes on and on. Again, if you don't have good equipment at home, you might want to take it to a professional for printing.

Thats it, hope its of some help. If not then I invite others to be of more help :)

Cheers,

Ankou

[edited for clarity, probally not for the last time :) ]
 

nettletea

Timely advice

Ankou,
Thankyou so much for your advice on photographing artwork. I was thinking about this yesterday, trying to form questions about how to go about. I'm thinking of taking a class at our local Jr. college, and need all the direction I can get. Now I know who I can ask.
Blessyou,
Nettletea
 

Ankou

Hey hon,

It was actually your thread here that made me decide to start this one :)

I just felt that this subject deserved its own little universe.

Try your local art college and or Arts org group. They often have classes specifically for photographing your own artwork.

Cheers,

Ankou
 

mythos

I have actually tried the overcast day thing, but have still found that colour-wise, they bleach out a lot. The sun here is pretty full on even with an overcast sky - in summer at least. I am assuming that where you are on the globe is important, having travelled some and had quite different results in different countries, and different results in this wide brown land.

Have you any ideas about dealing with this when you have a digital camera with the minimum of flexibility?

Mythos:)
 

Ankou

Digital with minimum flexability in the sunlight? Or color correction indoors?

I'm not sure what your asking, but I agree entirely with the sentiment about different geographical locations. I don't have a world wide experience, but anywhere I've shot in states it's been a matter of hitting the right time of day and overcast. I can imagine wildly different climates would be an issue. One thing you can do is try to work with bounce light. Essentially the light source is aimed at a white sheet, umbrella, piece of cardboard, and the light that bounces of it hits the art with a much less saturated force.

Think about the angles in a game of pool/billiards and imagine the light doing the same thing.

Mythos, I think I understand your question better after a little rambling :)

You could stake up a sheer sheet of fabric like a tent over the art easle, which would help diffuse the sunlight for you. If your sun is too yellow/ orange, a bluish sheet will help the light transition back to white. Or maybe a saturated plastic shower curtain...

As far as color goes I highly recommend a couple of filters they can go over the flash or the lense. If glass filters are too expensive or unavailable for your type of camera, you can always go by the local theatre supply and buy gel (thin transparent plastic sheets of color, good for all kinds of stuff) , or get it on-line from Rosco. The full size sheets are $6-$7 US through a supplier (here anyway :) ).

Is that helpful? Hope so, let me know if not.

I'm mostly a lighting person, rather than a manual camera user. So I do a lot of lighting correction for video and theatre.
 

temperlyne

I have been having terrible results with photographing my paintings. After I finish one I can't wait to put it online so I just put it on my bed, hoping for enough light, stand over it and take a shot. The angles are always different this way and so is the lighting. I know this is not a good way to tranfer my art to the net, but at the moment it is my only option... After I finish the majors, I will take them all to a studio and photograph them there.
 

mythos

Hi Ankou,

I think that you have answered my question. I am a complete no-knowledge photography dud so I will have to think through what you have said. I do remember using a yellow sheet as a background in the carport quite successfully a few years ago ... problem is that I can remember which paintings I was photographing; except that they were pre-tarot. I'll do some work on this ... and see how I go. Thank you, this will become very helpful as I work through this process and learn new skills.

The other thing is that some of my paintings have a high clear gloss finish. The purpose of this is many-fold. I like the finish and it's effect; it aids in keeping glued objects on the canvas (e.g. feathers, bones etc); and it keeps gold paint from tarnishing. The problem, of course, is light flare off the gloss surface even when not using a flash. Do you have any recommendations there, or should I ensure that I have a good quality photo prior to glossing the paintings?


thanks mythos:)
 

lizziecat

Ankou said:
One thing you can do is try to work with bounce light. Essentially the light source is aimed at a white sheet, umbrella, piece of cardboard, and the light that bounces of it hits the art with a much less saturated force.

One thing that always helped me with even illumination was my "pie plate reflector" - just an old aluminium foil pie plate that did quite a good job bouncing light without hot spots. For larger works, I'd crumple up some tin foil, flatten it out and then tape it to a piece of cardboard. Worked like a charm using available light.

I had a document copy stand that let me photograph work on the floor instead of on an easel or against a wall (less opportunity for distortion), but I also found that some tripods let you reverse the head to also photograph on the floor (much less expensive than a copy stand). Not good for large works, of course, but I think I was able to photograph up to 16" x 20" with the tripod.
 

mythos

Just call me dumb, but where do you put the pie plate or foil, or sheet for that matter in relations to the painting? As I was the families comedy relief when it came to pool playing, I think that I need a different metaphor to grap it. And, if you have a really big painting .... like 6 ft X 4 ft, do you need to create a foil piece larger than that? I'm so confused:confused:

mythos:)
 

Ankou

Hey Mythos,

It's a lot of trial and error for each person so try out different things an have fun.

As far as your clear coat goes, I would recommend either taking your pictures before coating or switching to a clear matt finish coat. You wouldn't want to do it on your paintings, but one trick we use for shiney surfaces is to spray it down with old fashined hair spray. This adds texture and keeps the light from glaring so badly. So if you found an archival matt clear coat (like they use for pastels) and sprayed that on existing work it would help a great deal (that is if you don't mind changing the overall finish of the original).

How the bounce works...

Think of light like a bounce ball. if you throw it at an angle agains the wall, it will returd at the same angle in the opposite direction. If you roll it in a sink it will roll around the curve then shoot strait out the end in the same arc it was already following.

I'm going to attach some photos I found on the net for example.

If you aim a light fixture straight at an object and have a white board behind the object, then some of that light will reflect and fill in the back side
(fig 1). If you aim a light away from an object but straight at a bounce board, then the light will bounce off the board and hit the object. Because light spreads when it hits the board you'll get a much softer and more evan light on the object. The more light bounces around the faster it moves (unlike a bounce ball :) ). Therefore, if you shoot light into an umbrella, the light rolls around in the curve (like the ball in the sink) and shoots out at a faster rate (=more light) and comes out in a limited arc matching the shape of the umbrella (like the bounce ball coming out of the sink). (Fig 2.) This gives you a more focused reflection and is why professional photographers like to use umbrellas instead of flat boards. You can make you own lighting umbrella by taking an old umbrella and spray painting the inside white or silver. Then mounting it to a stand. Or by using a pie plate which has rounded sides :).

Larger pieces will need larger reflectors, fidle around with it to find out how large but I recomend starting with a board 3/4 the size of the piece. If your shooting art work thats 4'x6', you definately want to save your self alot of hastle and build a sheer tent out side. The amount of light you'd need inside, with boards ect. is just going to be silly.

You can also build a shade around the lamp to focus and bounce light, Fig 3 & Fig 4.

OK... leaving that alone for a bit, because it sounds complicated to me! Does the bounce ball make more sense? Found a groovy version of the tent I was talking about in Fig 5.
 

Attachments

  • Fig 1.jpg
    Fig 1.jpg
    27.3 KB · Views: 93
  • Fig 2.jpg
    Fig 2.jpg
    3.9 KB · Views: 89
  • fig 3.jpg
    fig 3.jpg
    4 KB · Views: 89
  • Fig 4.jpg
    Fig 4.jpg
    6.4 KB · Views: 85
  • Fig 5.jpg
    Fig 5.jpg
    37.3 KB · Views: 80